New Videos from Youtube
Affichage des articles dont le libellé est Install. Afficher tous les articles

Install Windows XP on Compaq Presario CQ40-324TU

Use Nlite to sliptream ICH9 sata driver.
A good guide to sliptream sata driver
here:
http://maxeasyguide.blogspot.com/2008/04/preparations-for-winxp-installation-cd.html

Note: do NOT use sata driver from that guide, your sata driver is ICH9 given below.

Download ICH9 sata driver,
The driver is located in iaAHCI.inf
It is called ICH9M-E/M SATA AHCI Controller
here:
http://tinyurl.com/5nbgqd

Nlite download:
http://www.nliteos.com

A-Note Drivers Acer Drivers Alienware DriversApple DriversAsus Drivers-BenQDrivers Clevo Driver Compaq Drivers Dell Drivers DTK Drivers HCLDriver How-To HP Drivers Lenovo Drivers LG Drivers Medion Driver MSI Drivers NEC Drivers nVidia Drivers Packard Bell DriversPositivo Drivers SaharaSahara KN7 Samsung Drivers Single Driver Sony Vaio Toshiba Drivers

Install Windows XP in Compaq Presario CQ40-401AU Notebook

Compaq Presario CQ40-401AU is design for windows vista. Installing windows XP driectly using original windows XP CD will result in Blue Screen Error or " No hdd was found".

There is a famous trick to solve this problems which know as slipstream guiide to install windows XP. Slipstream process is not too difficult but for this model which use AMD sata drivers it can be a little bit tricky.

You can read how to slipstream guide here, something worth to mention is:
1. Make sure to use right sata drivers.
2. If you are about to repeat the process, delete all folders and create new folder.
3. If you failed 2 - 3 times, that normal.
4. Windows XP SP2 is preferable.

TUTORIAL LINK: Slipstream Guide to Install windows XP
A-Note Drivers Acer Drivers Alienware DriversApple DriversAsus Drivers-BenQDrivers Clevo Driver Compaq Drivers Dell Drivers DTK Drivers HCLDriver How-To HP Drivers Lenovo Drivers LG Drivers Medion Driver MSI Drivers NEC Drivers nVidia Drivers Packard Bell DriversPositivo Drivers SaharaSahara KN7 Samsung Drivers Single Driver Sony Vaio Toshiba Drivers
Install Windows XP on Compaq Presario CQ40-115au

Use XP SP2 only, most of XP drivers were built based on XP-SP2.

If you don't have XP with SP 2,get it first:
Download(optional)

Use Nlite to sliptream ICH9 sata driver.
A good guide to guide sliptream sata driver
here: (but do not use the ahci provided by the webpage download the aahci driver below)


Nlite download:
http://www.nliteos.com

ICH9 sata driver, the driver is located in iaAHCI.inf and is called ICH9M-E/M SATA AHCI Controller
Download


A-Note Drivers Acer Drivers Alienware DriversApple DriversAsus Drivers-BenQDrivers Clevo Driver Compaq Drivers Dell Drivers DTK Drivers HCLDriver How-To HP Drivers Lenovo Drivers LG Drivers Medion Driver MSI Drivers NEC Drivers nVidia Drivers Packard Bell DriversPositivo Drivers SaharaSahara KN7 Samsung Drivers Single Driver Sony Vaio Toshiba Drivers
Install windows XP in compaq presario cq40-337tu

Update Your Bios here. There are big changes in this new version.

Here is the guide to install XP,

First make vista backup:here

Prepare this material:

Download Nlite: Download

Sata controller: Download
32-bit Floppy Configuration Utility

A blank CD

You have to create a new windows XP CD using the one that you have:
Here is the guide to slipstream: GUIDE
A-Note Drivers Acer Drivers Alienware DriversApple DriversAsus Drivers-BenQDrivers Clevo Driver Compaq Drivers Dell Drivers DTK Drivers HCLDriver How-To HP Drivers Lenovo Drivers LG Drivers Medion Driver MSI Drivers NEC Drivers nVidia Drivers Packard Bell DriversPositivo Drivers SaharaSahara KN7 Samsung Drivers Single Driver Sony Vaio Toshiba Drivers
Install windows XP in compaq presario CQ40-317tu

1.First make Vista backup. How to do it all informations here.

2.Update Your Bios here.
This is very important for this model. If You will not do this Your audio may not work in XP.

Now You need to slipstream Your Sata drivers (only ICH9M) with nLite.
Download Nlite: Download
Download sata Drivers: Download

Read the Guide here: Slipstream Guide

Be sure also that You are using WinXP SP2 version. If you haven't got SP2 version here you can download this service pack: Download
A-Note Drivers Acer Drivers Alienware DriversApple DriversAsus Drivers-BenQDrivers Clevo Driver Compaq Drivers Dell Drivers DTK Drivers HCLDriver How-To HP Drivers Lenovo Drivers LG Drivers Medion Driver MSI Drivers NEC Drivers nVidia Drivers Packard Bell DriversPositivo Drivers SaharaSahara KN7 Samsung Drivers Single Driver Sony Vaio Toshiba Drivers
Install Windows XP on compaq presario CQ40-425TU

You need to create a new XP cd to install window XP on this laptop. So to do that we need to perform a process called slipstream.

Materials need to download:

Nlite: Download
Intel ICH9M-E/M SATA AHCI Controller Driver: Download
Windows XP sp2 patch: Download

and then follow this instruction: here
A-Note Drivers Acer Drivers Alienware DriversApple DriversAsus Drivers-BenQDrivers Clevo Driver Compaq Drivers Dell Drivers DTK Drivers HCLDriver How-To HP Drivers Lenovo Drivers LG Drivers Medion Driver MSI Drivers NEC Drivers nVidia Drivers Packard Bell DriversPositivo Drivers SaharaSahara KN7 Samsung Drivers Single Driver Sony Vaio Toshiba Drivers
Slipstreaming Guide To install Windows XP

In 2009, Serial ATA (SATA) has mostly replaced parallel ATA. So installing Windows XP will cause BSOD for certain model, to solve the problems we need to integrate SATA into windows XP Installation disk and this process called slipstream.

Content:
A :Materiel Needed
B: Sata Driver Download
C: Slipstream Guide


Material needed:

1.Nlite Software: Download Here
2. Windows XP CD
3. Empty CD-R/DVD-R

Sata Driver Download

Extract the driver using winrar.
Intel Sata Driver: Download Guide (Intel has moved the download link)
AMD Sata Driver: Download
Nvidia Sata Driver: Download

How to check my model need Intel, AMD or Nvidia sata drivers?
Install CPU-z and run the program, look at the chipset on mainboard tab.
it will show you what type of Chipset you have AMD/ATI, Intel or Nvidia, so select the Sata base on your chipset.

additional info:
If you want more details with pictures, you can read my post:  Sata driver for slipstream process here.
If you download the sata directly from Intel (for Intel model), you can found the instruction to extract it here.


Slipstream Guide


1. create a new folder and name it as "WINXP" or any name you like, copy all the content in your xp installation disk (explore cd and press ctrl+A) and paste it in the new folder you just created.
2.Extract the sata driver you downloaded.
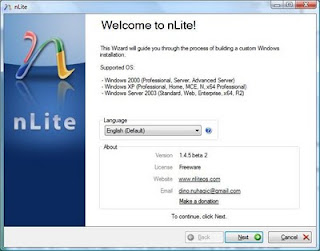
3. Intsall Nlite and run it. On the first screen just click next.


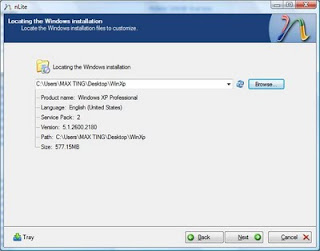
4. Now locate/browse to the folder "WINXP" you created.

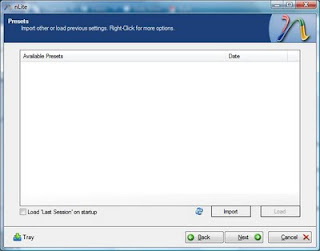
5.Next and you will come to "Presets", ignore this and click "Next".

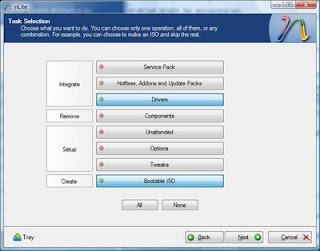
6. In "Task Selection", choose "Drivers" and "Bootable ISO" by high-lighting them.

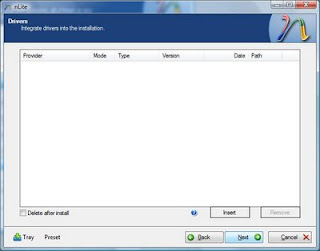
7. For intel select single driver
For amd select multiple driver

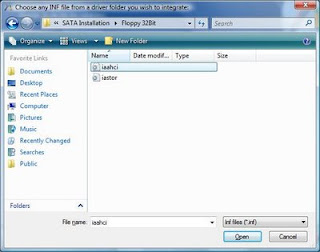
8. For intel Browse to the SATA driver folder which you extracted earlier(I named it "Floppy32Bit") and select either one of the .INF file, i suggest "iaahci.inf".

-for amd browse to raid 7xx, slect x86 and select the inf files.
SELECT ONLY x86.


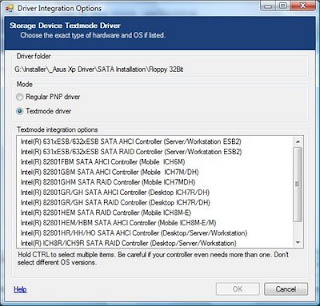
9) A screen like below will pop-up, make sure it's "Textmode driver" and select all of them by holding CTRL+A key and choose "OK", the pictures below for intel installation.

If you arrive at this step for installation its similar for both amd and intel.


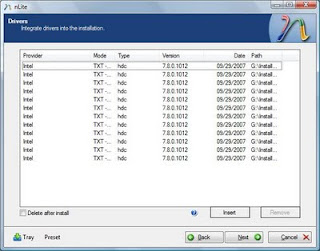
10) You shall see something like this. Choose "Next" and you will be prompted.


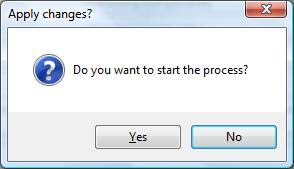
11) Choose "Yes" to start the process.


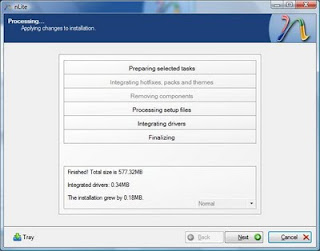
12) Let it finish and choose "Next".


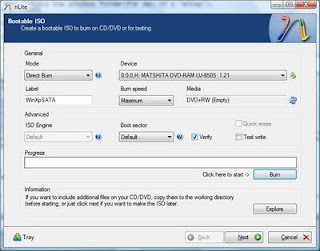
13) Finally, you can create your project as ISO image or burn it directly to CD-R under "Mode". choose "Direct Burn". You can put anything for "Label" but not too long. Choose "Burn" and you will be prompted again. You can also choose to create iso to burn using software such as nero.


14) Choose "Yes" to burn it to CD-R. Wait for it to finish and choose "Next"


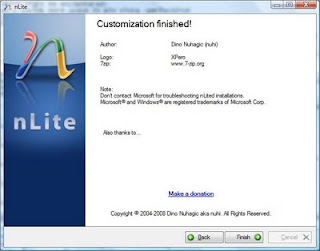
15) Choose "Finish" to exit nLite.
Additional notes.
-If your slipstreaming process unsuccessful, you can repeat the process but create a new folder and DO NOT USE THE SAME FOLDER.
A-Note Drivers Acer Drivers Alienware DriversApple DriversAsus Drivers-BenQDrivers Clevo Driver Compaq Drivers Dell Drivers DTK Drivers HCLDriver How-To HP Drivers Lenovo Drivers LG Drivers Medion Driver MSI Drivers NEC Drivers nVidia Drivers Packard Bell DriversPositivo Drivers SaharaSahara KN7 Samsung Drivers Single Driver Sony Vaio Toshiba Drivers
Install Windows XP in Compaq CQ60 Guide

To Install Windows XP On this model, It is base on you CQ60 chipset. For model with Nvidia chipset you can directly install windows XP in this model. For Intel and AMD model you need to perform slipstream method to install windows XP.

What is Slipstream method?
It is a method to create a custom bootable windows XP installation CD. This method is alternative for using floppy disk (which most laptop didn't have this device) to install windows XP.

Why?
Basically to install windows XP in most model which design for windows vista requires SATA driver. During Installation it will ask "Press F6 to install sata...." , so if you have floppy disk you can press F6 to install proper sata driver.So, there is another way to install without floppy is by integrate your sata driver into your windows XP installation disk.

What happen if install with no sata driver?
You will end up with the following error:
1. No Hard Disk Drive Found
2. BSOD (Blue Screen Error).

How to do it?
Simply refer to my guide here: Slipstream method to Install windows XP
A-Note Drivers Acer Drivers Alienware DriversApple DriversAsus Drivers-BenQDrivers Clevo Driver Compaq Drivers Dell Drivers DTK Drivers HCLDriver How-To HP Drivers Lenovo Drivers LG Drivers Medion Driver MSI Drivers NEC Drivers nVidia Drivers Packard Bell DriversPositivo Drivers SaharaSahara KN7 Samsung Drivers Single Driver Sony Vaio Toshiba Drivers
Install Windows 7 From USB

Ok to install Windows 7 using USB (pendrive etc). I devide the process into 2 step which:

1. Create a Windows 7 Bootable USB Device.
2. Setting BIOS to boot from USB

-------------------------------------
Materials and Software needed:
-------------------------------------
1. Download Windows 7 USB/DVD Download tool and install
    Direct link: Download
    Website    : Intel website (incase the direct link broken or moved)

2. A 4GB(recomended) pendriver/Flash drive.
    (this is because the file for windows 7 is larger then 3GB)

3. A Windows 7 ISO files OR windows 7 DVD.

--------------------------------------------------
PART 1: Create a Windows 7 Bootable USB Device
------------------------------------------------------------

1. First make sure you already install Windows 7 USB/DVD Download tool.

2. If you have Windows 7 DVD insert it in your DVD/CD ROM and for those who have Windows 7 ISO file proceed to step 3.

3. Now open the Windows 7 USB/DVD Download tool software ans select browse.

4. Now you have to choose your ISO file, If you have the ISO file stored in your computer browse for the ISO file and if you are using DVD select your DVD after clicking browse. After select the file press Open/Ok.


5. Then select next.

6. Then select the USB devices.

9. Now you need to select your pendrive. note that in 1 (picture below) confirm that you choose the USB device that you will use to create bootable USB. If it show othe devices click on it and select your USB drive. After that select COPY.


8. NOW you it will prompt two times to confirm because this process will erase and format your USB devices/pendrive and all your data in the pendrive will lost.

select Erase USB device 

Select OK
(note for beginner: this will not erase any data in your hardisk, it will only erase data in your Pendrive)

9. After that it will begin formating and copying, just wait until it finish.

10. After complete, now you are ready to install windows 7 using your USB device.

11. Now you can safely remove your USB and proceed to boot from you USB.


----------------------------------------------
PART 2: BOOT FROM USB DEVICES
-----------------------------------------------

1. Ok now your USB now can be use to install windows 7 on your Notebook/PC, but first you need to change the device order.

2. The setting may differ from one model to another, i hope you canfigure it iout after reading the steps below.

3. restart your notebook/PC. ans see at the picture below. It show press F2 to enter setup. now press F2.
This post screen is fast so you need to press F2 as Quickly. Other computer like mist desktop have to predd DEL (delete button) to enter the BIOS.


4. Now at the BIOS look for the BOOT like in the picture below. Your flash should be in the first boot order.


5. If not move it by press F6(up) and F5(down) , note: other notebook may need to press +/- to move the USB flash drive as the first boot device in the boot order.

6. Then press F10 (to save the current configuration) and press enter.


restart and you will see the windows 7 setup is starting.
A-Note Drivers Acer Drivers Alienware DriversApple DriversAsus Drivers-BenQDrivers Clevo Driver Compaq Drivers Dell Drivers DTK Drivers HCLDriver How-To HP Drivers Lenovo Drivers LG Drivers Medion Driver MSI Drivers NEC Drivers nVidia Drivers Packard Bell DriversPositivo Drivers SaharaSahara KN7 Samsung Drivers Single Driver Sony Vaio Toshiba Drivers
Install Ubuntu Inside Windows (WUBI)

In this tutorial I will show how to Install Ububtu inside windows (dual boot windows and ubuntu)

===========================
CONTENTS:
===========================
I. Downloading ISO and WUBI file
II. Selecting Partition
III. Installing Ubuntu
IV. Some Notes
==========================

I.  Downloading ISO and WUBI file

1. Ubuntu ISO file : Download here
(select the latest version from drop down menu and select 32-bit if you are new to ubuntu)
(note that the latest is 10.10 and over time there will be other release)

click on the picture to enlarge


2. WUBI Installer: Download here


Save both file and wait until. download finish.

II. Selecting Partition

1. You can use any partition you want because it will not clean up your data on the selected partition.
2. You can easily remove ubuntu installation via add/remove program from control panel.
3. Make sure you partition have at least 17GB free. (minimum space is 15GB)

III. Installing Ubuntu

1.  Here i select one of my partition -  D partition, and i rename it with ubuntu.


2. After finish download both file, palce them in D drive (or any partition you want to install ubuntu)


3. Double click on WUBI and you will see this screen.
by default, it will select C partition as installation drive, so you have to change to drive you want to install.

4. change the following:


1- Installation drive : change it to the partition you want to install ubuntu.
2 - select the size of your ubuntu installation, minimum 15GB (make sure after installation the space not less then 2GB.
3 -Insert password, it a must to continue installation.
---click Install--- 

5. After clicking install it will begin to install:

6. When it finish, you will be prompt to restart, restart your computer to continue installation.

7. After restart, on the boot selection select ubuntu.

8. After that, a screen will appear with a countdown 5, 4.... and at this part, you do not need to do anything, just wait it install untill it reboot. After reboot your ubuntu installation is complete.

IV. Some notes

1. So after finish installing, every time you turn on your computer you will see the OS selection, to use ubuntu simply select ubuntu.
2. You can remove ubuntu installation from control panel -add/remove program.
3. After log in to your ubuntu - run updates first.

------------------------------------------------------------------------------------------------
P/s: nothing important here, just if you want to read something (^^)
Ubuntu provide wubi to install ubuntu, i try wubi and it took me like forever to install it. I notice that wubi will first downloading the ISO file for installation (about 1-2 hour to wait). So, my idea is to download the ISO and place it with the wubi, so it will not download the ISO but instead use the ISO i downloaded earlier and it WORKS. I also notice that downloading ISO separately are faster the WUBI downloading it.
--------------------------------------------------------------------------------------------------

A-Note Drivers Acer Drivers Alienware DriversApple DriversAsus Drivers-BenQDrivers Clevo Driver Compaq Drivers Dell Drivers DTK Drivers HCLDriver How-To HP Drivers Lenovo Drivers LG Drivers Medion Driver MSI Drivers NEC Drivers nVidia Drivers Packard Bell DriversPositivo Drivers SaharaSahara KN7 Samsung Drivers Single Driver Sony Vaio Toshiba Drivers
Install Windows XP on HP Pavilion G4

To install windows XP in this model you need to perform slipstream process.
For those who not familiar with slipstream process, it is a process where we modify the original Windows XP installation file into a new Windows XP Installation file which contain a file (SATA DRIVER) which needed to perform the XP installation.
We need to integrate the sata driver because the laptop will not detect any HDD without it.
So to perform the slipstream process you can refer to my tutorial here:
http://laptop-driver.blogspot.com/2009/10/slipstreaming-guide-to-install-windows.html
A-Note Drivers Acer Drivers Alienware DriversApple DriversAsus Drivers-BenQDrivers Clevo Driver Compaq Drivers Dell Drivers DTK Drivers HCLDriver How-To HP Drivers Lenovo Drivers LG Drivers Medion Driver MSI Drivers NEC Drivers nVidia Drivers Packard Bell DriversPositivo Drivers SaharaSahara KN7 Samsung Drivers Single Driver Sony Vaio Toshiba Drivers
How to Install Acer Drivers

Do read the instruction carefully. You can get the drivers online by serching your model on the Acer.com or on this blog, you can also request drivers here.


Instructions:
1. You must extract the driver first using software winrar or 7zip (any compress tools).
right click and select extract file

2. Open the extracted driver folder and double click on the setup.exe or install.exe to install
4. Follow the on-screen instructions to perform the installation.
5. When the installation is complete, restart the system.
A-Note Drivers Acer Drivers Alienware DriversApple DriversAsus Drivers-BenQDrivers Clevo Driver Compaq Drivers Dell Drivers DTK Drivers HCLDriver How-To HP Drivers Lenovo Drivers LG Drivers Medion Driver MSI Drivers NEC Drivers nVidia Drivers Packard Bell DriversPositivo Drivers SaharaSahara KN7 Samsung Drivers Single Driver Sony Vaio Toshiba Drivers

Guide To Install Compaq and HP Driver

This tutorial will show how to install Drivers in HP and Compaq model.
Difficulty: easy
Note: This guide only for drivers officially release by HP and Compaq. It will not cover manual installation using drivers from other source.

INTRODUCTION:
For HP and Compaq model, the official drivers name will start with SP which refer to SoftPaq. So
Example : SP30399 (SP is short term for softpaq)

So if your driver file not start with SP, the drivers is either not from HP or originally from HP and edited by other party.
SoftPack package is formatted with exe extension which refer to executable file. excutable file mean you can run the program by double click on it, in this case to install the driver.

INSTALLING:

1. Make sure you download the appropite driver you need. If you did not have the appropriate driver you can request here:  http://laptop-driver.blogspot.com/2012/02/request-driver-version-4.html

2. After finish downloading the driver, you will get a file which look like this:
The softpaq name SPXXXX varies base on the driver file.


3. Then double click on it to install, the best way to do it is by right click and select 'run as administrator".
if "right click and run as admin", you will be prompted, so click YES.


4. Next step is to follow the on screen instruction and agree with the terms and agreement.


5. Then click next until installation finish. The first installation will unpack the driver file into SWsetup folder in C drive.
6. Continue with the installation by following the on-screen instruction until installation finish and reboot.

IF you get ERROR:

"Driver Installation failed: Could not find the device for this driver"

It means the driver is not compatible with your system. You need to make sure the driver you are using is the right driver for your laptop.
Take note, HP sometimes provides more than 3 option for wireless driver, so you have to choose base on your specification or you have to test which work for you. Installing wrong driver will not harm your system but it will result in error.
Let me know if you need advise or assistance in this matter.
A-Note Drivers Acer Drivers Alienware DriversApple DriversAsus Drivers-BenQDrivers Clevo Driver Compaq Drivers Dell Drivers DTK Drivers HCLDriver How-To HP Drivers Lenovo Drivers LG Drivers Medion Driver MSI Drivers NEC Drivers nVidia Drivers Packard Bell DriversPositivo Drivers SaharaSahara KN7 Samsung Drivers Single Driver Sony Vaio Toshiba Drivers
Dell Driver Install Order

First of all after Operating System Installation, you need to install drivers and application in correct order so that your notebook can function properly. Your drivers available on dell download site or you ask for drivers in the comment section below.

 Drivers Install Order for Dell Notebooks

1. Dell System Software System Utilities/Dell Quickset
 Provides critical updates and patches for the operating system.

2. Chipset driver
Chipset Helps Windows control system board components and controllers, such as USB ports and other internal components.

3. PCMCIA and/or Smartcard drivers  (Card Reader)
Security Enables PCMCIA and Smartcard slot capability.

4. Intel Matrix Storage Manager Serial ATA
 The Intel storage driver is only applicable to Intel chipset computers.

5. Audio driver
Audio Enables and enhances the audio controller.

6. Video driver
 Video Enhances video performance.

7. Network interface card or Ethernet drivers
 Network Enhances the network controller for internet or network access.

8. ControlPoint System Manager,
ControlPoint Security Manager, and ControlPoint Connection Manager
Note: This driver is only needed for some Latitude laptops, and depending on your system configuration, you might not need to install all three parts. Control Point The Dell ControlPoint (DCP) controls power management for some Dell Latitude laptops. ControlPoint System Manager controls power management and ambient light sensor settings, ControlPoint Security Manager controls security features, and ControlPoint Connection Manager controls wireless connection profiles.

9. Dell Quickset Application
Controls power management and ambient light sensors.

10. Wireless network drivers
Network Enables and enhances the wireless network controller.

11. Bluetooth drivers
Note: If this driver is not available, then your computer doesn't have Bluetooth capability. Continue to the next driver on the list. Network Enables and controls Bluetooth connectivity.

12. Mouse, keyboard, touchpad and input device drivers
Mouse, Keyboard and; Input Devices Enhances pointing device features.

13. Intel vPro or AMT (if available) Chipset
Enhances system manageability.

14. Dell wireless mobile broadband card drivers (if available) Network Enables wireless broadband connectivity.

15. Modem drivers (if available) Modem/Communications
Allows dial-up capability.

16. Dell Digitech touch screen driver (if available)
 Mouse, Keyboard and Input Devices Enables touch screen input on select Dell laptops.


Additional Information:

1. If you already install the drivers without following the correct order as shown above, don't worry, just make sure everything works in your laptop.

2. You can re-install all drivers again following the order given.

3. IF you notebook come with AMD processor, normally you won't need any chipset drivers. If you believe you need it, you can install latest south bridge drivers and AMD USB filter from AMD support site.

4. For external modem, you need to connect the modem first before modem driver installation. If you have internal modem, you will know by looking at the product specification.

5. Patch and Upgrade. For model with AMD and ATI graphic, it is recommended to install Netframework 2.0 and 3.5 (windows XP only) before driver installation.
A-Note Drivers Acer Drivers Alienware DriversApple DriversAsus Drivers-BenQDrivers Clevo Driver Compaq Drivers Dell Drivers DTK Drivers HCLDriver How-To HP Drivers Lenovo Drivers LG Drivers Medion Driver MSI Drivers NEC Drivers nVidia Drivers Packard Bell DriversPositivo Drivers SaharaSahara KN7 Samsung Drivers Single Driver Sony Vaio Toshiba Drivers

How to Install Driver Without Internet Connections

Your PC and Notebooks/Laptop needs drivers after windows/OS installation. What we normally do is run automatic updates so windows will download and install  necessary drivers for our system. What if there are no internet connection? Example, you just finish installing windows 7 on your notebook but there are no wireless connection because the wireless drivers not yet installed. There are few ways we can install drivers without internet connection.

1. Use the Installation Disk/CD - (if you still have it)
Usually your computers comes with installation disk/CD/DVD, you may have more than one disk/CD/DVD. One of the disk contains drivers for your computers. What you need to do is insert the disk into CD/DVD-ROM and run the setup to install the drivers. You can identify the Drivers installation disk by looking at the cover written "drivers and utility" or similar.

2. Download from second device and transfer it to your computers.
If you have other device that do have internet connection, you can use it to download the drivers for your computers and transfer it via USB cable/ThumbDrive etc. Example, if you have an iPad, browse the internet and go the manufacture site and then search your model within the manufacture site. Download the drivers and transfer it to your computers.

3. Using Restore/Recovery CD.
Most notebooks manufacture provide recovery CD, insert your recovery CD and follow the on-screen instruction to complete the process.

4. Look for driver backup in your hard-disk (Sometimes Hidden)
This option available if you didn't wipe out your entire disk for windows installation. If you install windows Vista/7/8 over previous installation (install without formatting) or (upgrade), you will have a Windows.Old folder on your c drive. If you open that folder you will see your original files store in that folder. If you are using notebook there are a great chance that your drivers are in the folder. For example Hp product will have Swsetup folder in the windows.old drive, Dell will have dell folder, Toshiba will have "driver" folder, similarly with other laptop. Sometimes, you just did not notice the company already make drivers backup on your other partition (D/E).

5. Final Option - Cybercafe
This will cost you some dollars to go and download your drivers - store it in CD/external storage, but better than repair shop fee.

Best Practice:
Make sure to backup your drivers on Mass storage Device (pendrive/card reader/external hard disk etc) or CD/DVD for future use and never trash any recover/drivers CD provided by the manufacture.
Make sure you have all the drivers needed before installing new Operating System and check whether your manufacture support the Operating System of your choice or not.
A-Note Drivers Acer Drivers Alienware DriversApple DriversAsus Drivers-BenQDrivers Clevo Driver Compaq Drivers Dell Drivers DTK Drivers HCLDriver How-To HP Drivers Lenovo Drivers LG Drivers Medion Driver MSI Drivers NEC Drivers nVidia Drivers Packard Bell DriversPositivo Drivers SaharaSahara KN7 Samsung Drivers Single Driver Sony Vaio Toshiba Drivers
 
Support :
Copyright © 2011. direct download iso - All Rights Reserved