New Videos from Youtube
Affichage des articles dont le libellé est sound. Afficher tous les articles

Compaq Presario V2414NR Windows 7 Sound Driver

Your Audio is:
Conexant CX20468-31 AC97

to install the driver there are some method you need to do.
note: just try to update driver manually by:

- Opened device manager (right click on my computer and select manage, search for device manager at the left)
- Right click - On the audio(with yellow mark) right click and select Update Driver Software
- select no to search online, select manually install driver, select dont search i will choose the driver to install adn next browse to c:\swsetup\sp30399
- Clicked Next

IF THE METHOD ABOVE DIDN'T WORK, FOLLOW THIS STEPS:

1. Download driver sp30399! You can get it from here: Download

2. Run the exe

3. Go to the extraction folder (Default: c:\SWSetup\SP30399)

4. Edit qta3091.inf:
Search code block:
[Conexant]
%*WDM_AMCAUD.DeviceDesc%=WDM_AMCAUD,PCI\VEN_1002&DEV_4370&SUBSYS_3091103C

and add this line under:
%*WDM_AMCAUD.DeviceDesc%=WDM_AMCAUD,PCI\VEN_10B9&DEV_5451&SUBSYS_0024103C&REV_02

So the result would look like this:
[Conexant]
%*WDM_AMCAUD.DeviceDesc%=WDM_AMCAUD,PCI\VEN_1002&DEV_4370&SUBSYS_3091103C
%*WDM_AMCAUD.DeviceDesc%=WDM_AMCAUD,PCI\VEN_10B9&DEV_5451&SUBSYS_0024103C&REV_02

Attention! I've copied this part from the device manager:
"PCI\VEN_10B9&DEV_5451&SUBSYS_0024103C&REV_02"

You may have a different device description. If you wanna be sure, go to the device manager, open the unrecognized audio device's property page, select "Details" tab, and select "Hardware Ids" from the Property combo! Copy any of the listed strings and replace it with my device description!

So the final result would look like this (if you have different device desc.):
[Conexant]
%*WDM_AMCAUD.DeviceDesc%=WDM_AMCAUD,PCI\VEN_1002&DEV_4370&SUBSYS_3091103C
%*WDM_AMCAUD.DeviceDesc%=WDM_AMCAUD,HERE COMES YOUR DEVICE DESCRIPTION
5. Now all you have to do is to install the driver manually through device manager like the first method i posted above with blue font

Credits: MR. RAVEN
A-Note Drivers Acer Drivers Alienware DriversApple DriversAsus Drivers-BenQDrivers Clevo Driver Compaq Drivers Dell Drivers DTK Drivers HCLDriver How-To HP Drivers Lenovo Drivers LG Drivers Medion Driver MSI Drivers NEC Drivers nVidia Drivers Packard Bell DriversPositivo Drivers SaharaSahara KN7 Samsung Drivers Single Driver Sony Vaio Toshiba Drivers
General sound driver for compaq

I created this post to cover the failure of sound installation for Compaq Laptop after downgrade to XP. This post basically for Compaq Presario CQ35-216TU and since this post is still new, you feedback are important.

MS-UAA
(install before audio, restart after installation)
http://ftp.hp.com/pub/softpaq/sp33501-34000/sp33867.exe


1. Conexant High-Definition SmartAudio 221 Driver
http://ftp.hp.com/pub/softpaq/sp34001-34500/sp34200.exe

Unzip to a folder (using winrar)..use Device Manager,right click "Audio Device on HD",choose Update driver,
No to connect,
Install from a list or specific location,
Select Don't Search, I will choose the driver to install,
For the Hardware Type select 'Show All Devices'
Remove the check from "Show Compatible Hardware" and click on "Have Disk".
Next...browse to the unzipped folder and choose the "WiSVHe5.inf".
Ignore XP when it complains.
Reboot.


VERSION 2: IDT-hidh definition audio codecs


IDT High-Definition Audio CODEC Driver,

1. sp41693, vista driver, reported work in XP
ftp://ftp.hp.com/pub/softpaq/sp41501-42000/sp41693.exe

2. sp39671, vista driver, reported works in XP here
ftp://ftp.hp.com/pub/softpaq/sp39501-40000/sp39671.exe


High-Definition Audio (HDA) Modem
ftp://ftp.hp.com/pub/softpaq/sp39501-40000/sp39671.exe

ADDITIONAL NOTES:

SOUND DISSAPEAR AFTER RESTART:
------------------------------------------------------------
1. Try using this ms-uaa:
ftp://ftp.hp.com/pub/softpaq/sp42001-42500/sp42126.exe
-------------------------------------------------------------

2- Using devcon:
If you found the sound was not working after restart, do the following steps

1. Download devcon command line utility,
http://support.microsoft.com/kb/311272


2. Extract and copy the file to c:\windows\devcon\i386\devcon.exe

The command line as: C:\windows\devcon\i386\devcon.exe restart "PCI\VEN_8086&DEV_293E&SUBSYS_3607103C&REV_03"


Notes:

1. The location of devcon.exe is in c:\windows\devcon\i386\devcon.exe if you change it, you need to edit idt.bat

2. "PCI\VEN_8086&DEV_293E&SUBSYS_3607103C&REV_03" is hardware ID for MS-UAA, if you found it in a different name change it.

3. Place idt.bat in c:\Documents and Settings\All Users\Start Menu\Programs\Startup

4. The sound will be restore within 6-10 seconds, because of that there is NO sound of XP start-up
(note: if this method failed, remove devcon utilities)

A-Note Drivers Acer Drivers Alienware DriversApple DriversAsus Drivers-BenQDrivers Clevo Driver Compaq Drivers Dell Drivers DTK Drivers HCLDriver How-To HP Drivers Lenovo Drivers LG Drivers Medion Driver MSI Drivers NEC Drivers nVidia Drivers Packard Bell DriversPositivo Drivers SaharaSahara KN7 Samsung Drivers Single Driver Sony Vaio Toshiba Drivers
Sound Disappear After Restart - Part 2

Here is the second method for most Compaq CQ which the sound disappear after restart.
this solution regarding to audio works after installing batch file KB835221.

Download the CQaudiosolution: Download

Inside the RAR file there is an audio patch and devcon patch file. Devcon file will solve issue with KB835221 (missing PnP function id). Follow the given instruction below

a) You must install two patches first from Microsoft: KB835221 (UAA version 1.0) and then kb888111 (UAA update version 1.0a)

b) Install the IDT HD Audio driver (you can use your Vista driver from HP site as well)
c) Extract CQAudioSolution.rar you've downloaded
d) Extract devcon.exe self-extracter from Devcon folder extracted in c)
e) Copy devcon.exe from extracted folder in (d) to C:\WINDOWS\SYSTEM32
f) Run Audio path from extracted Audio Path folder in c)
g) Restart
h) You should be able play sound with IDT HD Audio after restart.

However, in Device Manager, there is a exclamation icon on "Audio Device on High Definition Audio Bus". This is installed by KB835221 patch. Just ignore it. The CQAudioSolution will make sure that there is no more issue with missing IDT HD Audio when restarting after installing the IDT HD Audio driver.

Credits:
t3chn0m4nc3r
A-Note Drivers Acer Drivers Alienware DriversApple DriversAsus Drivers-BenQDrivers Clevo Driver Compaq Drivers Dell Drivers DTK Drivers HCLDriver How-To HP Drivers Lenovo Drivers LG Drivers Medion Driver MSI Drivers NEC Drivers nVidia Drivers Packard Bell DriversPositivo Drivers SaharaSahara KN7 Samsung Drivers Single Driver Sony Vaio Toshiba Drivers
Installing Sound in Compaq CQ Series

Compaq Presario CQ series here including CQ40, CQ35 and CQ45. This method also applicable to other model which use IDT audio drivers. For other CQ model which use Conextant audio the patch installation and method is similar, the difference is you need to locate conextant audio drivers.
Last update: June 14 2013

PATCH INSTALLATION

If you already install ms-uaa you may skip this step.
 Before proceed with audio Installation you need to install Microsoft Universal Audio Architecture first. Below is the patch you needed.

Microsoft Universal Audio Architecture (MS-UAA)

Windows XP, XP SP2:  Knowledge Base 888111 (KB888111)
Download 

Windows XP SP3:Knowledge Base 835221 (KB835221)
 Download  (KB835221)

This downloads also available in Microsoft website, you just need to search the KB888111..etc.


DOWNLOAD AND INSTALL: IDT AUDIO DRIVERS

I provide few driver version here which reported work in most CQ40. The trick is simple, you just need to get your original vista drivers first. Here is the recommended and tested driver version.

SP39671.exe: Download - recommended (original xp driver for IDT)
SP41693.exe: Download 
SP45100.exe: Download
SP41616.exe: Download
 
Now Install the driver you selected from the list above or your original vista drivers. (do not restart) If the installation successful with no error, try any audio file for confirmation. If it resulting in error, or no sound after successful installation proceed with next step.

MANUALLY INSTALL DRIVER

This manual installation is also know as "have disk method".

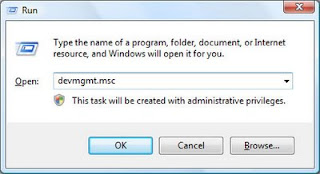
1.First open device manager by click start and select run type "devmgmt.msc" as shown in the pictures below.


2.Below you will see there are many drivers with yellow, select the Audio with the yellow mark, right click on it and select update driver.


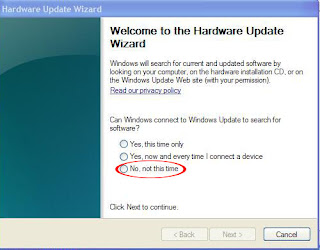
3. Harware update wizard screen will appear, select no to connect, next


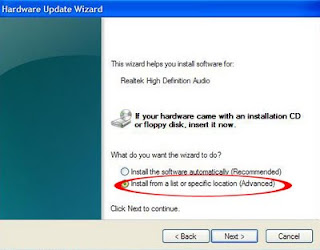
4.Select Install from list specific location, next


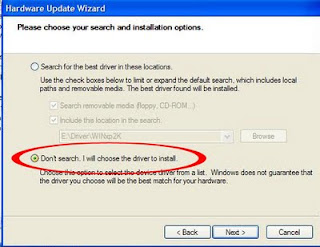
5. select dont searh i will choose the driver to install, next

6.then select all drivers on the next screen then make sure you uncheck the "show compatible drivers" box, select have disk

7. then select browse:


8. Then browse to the directory c:\swsetup


9. Ok in this step i will show for SP39671 audio. So after open the swsetup folder select the SP36971 Folder. If you use other audio make sure to select the folder name similar to yours example: sp45100.


10. After open the SP39671, there 3 folder and select the wdm folder. For other audio driver maybe you will have the similar folder or different, Important to remember we a re looking for files ended with INF extension. Here for SP39671, after open the folder slect WDM folder and Select WInXP folder


11. Then select the STHDA.INF (STHDA64.INF is for 64 bit) anyway press OK . Ignore if XP Complaint. then try to play some music (suggested simple mp3, no rmvb, flv or other player that require codec).
INF file may have different name if you are using different driver version
In case the audio driver you have and i gave earlier didn,t work leave your comments and i will assist you for further instructions.


HDMI and NO SOUND AFTER RESTART

Some model will have issue with HDMI. To know either you have this issue or not, Simply after driver installation above a "new hardware found" windows appear. Download this driver first:
SP39545.exe

Now install this this driver first (do not close a new hardware found windows), after finish install, get back to the "a new hardware found windows" follow the audio installation we did earlier until we get the inf file.

In case the Audio Disappear After restart follow the Guide here:

AUDIO DISAPPAER AFTER RESTART: PART 1
AUDIO DISAPPAER AFTER RESTART: PART 2


A-Note Drivers Acer Drivers Alienware DriversApple DriversAsus Drivers-BenQDrivers Clevo Driver Compaq Drivers Dell Drivers DTK Drivers HCLDriver How-To HP Drivers Lenovo Drivers LG Drivers Medion Driver MSI Drivers NEC Drivers nVidia Drivers Packard Bell DriversPositivo Drivers SaharaSahara KN7 Samsung Drivers Single Driver Sony Vaio Toshiba Drivers
No sound after Windows Update and Upgrade

Windows updates and Windows upgrade sometimes may mess up with earlier driver configuration for your audio. Updates and Upgrade normally installed a newer driver, update the driver to the latest version that they think best for your system or re-configure the audio configuration and setting. So what to do if this happen?

First Step
Make sure you have installed the audio driver first. You can obtain the driver from the manufacture site. Example, if you have HP laptop you can go to http://h20180.www2.hp.com and select support from the menu. Navigate through each option available to look for your model and download the necessary driver.

What if there are no driver for my audio in the manufacture site?
Post your laptop model in the comment section and I'll give the download link for your audio driver.

I already install audio driver but resulting in error
Normally this refer to compatibility issue, sometimes manufacture only release drivers for certain Operating System. What i would suggest is to look for device update on the hardware manufacture site like Realtek etc. If you need help on this do let me know.

Check your Audio Setting
Make sure you have the right setting for the audio, sometimes windows update made changes to the setting.  For Windows 7 select manage audio device from control panel - hardware and sound, you will see several option and select speaker as default or test which work for you.


Realtek user have the advantage of using the audio setting by using the Realtek HD Audio Manager. Make sure you select the right option for the audio jack.


System Restore - Undo Changes
System restore let you revert back to previous state where the audio is still working. This is the easiest and the best solution to the problems. There are many restore point available to choose so select the date where the audio still working. If you need tutorial on how to perform system restore you can read here.

Why there are no restore point available?
You need to turn on/activate restore point to use it. By default windows already enable this option for C drive. Sometimes if you have optimization software such as tune up utilities , it will disable this option to give you more disk space. Remember that windows reserve some space on C for system restore.

Uninstall Updates
If your audio and sound not working after updates then you need to remove those updates. You can do this by:

1. Click Start button Picture of the Start button, clicking Control Panel, clicking Programs, and then, under Programs and Features, clicking View installed updates.

Click the update that you want to remove, and then click Uninstall. Administrator permission required If you're prompted for an administrator password or confirmation, type the password or provide confirmation.

 Select updates that you installed which cause the audio not working after the update installation. To see the changes you may need to reboot first.

Uninstall Upgrade
Removing SP1 from Windows 7
  1. Click the Start button Picture of the Start button, click Control Panel, click Programs, and then click Programs and Features.
  2. Click View installed updates.
  3. Click Service Pack for Microsoft Windows (KB 976932), and then click Uninstall.
    If you don't see Service Pack for Microsoft Windows (KB 976932) in the list of installed updates, your computer likely came with SP1 already installed, and you can't uninstall the service pack. If the service pack is listed but grayed out, you can't uninstall the service pack.
Remove windows 8.1 on windows 8
There are no option to remove windows 8.1 from windows 8 unless you are using windows media center. You can do this by using system reset (similar with system restore describe above).

Remove windows XP service pack.
Let me clarify that the best Service Pack base on my experience is SP2 which seems the most stable whenever it comes to installing drivers. To remove (downgrade you windows XP service pack you can do it by:
  1. Click Start, and then click Run.
  2. Copy and then paste the following command in the Open box, and then press ENTER:
    appwiz.cpl
  3. Click to select the Show Updates check box.
  4. Click Windows XP Service Pack 3, and then click Remove.
  5. Click Finish to restart the computer after the removal process is complete.
If you still have problems with your audio do let me know in the comment section below.

    A-Note Drivers Acer Drivers Alienware DriversApple DriversAsus Drivers-BenQDrivers Clevo Driver Compaq Drivers Dell Drivers DTK Drivers HCLDriver How-To HP Drivers Lenovo Drivers LG Drivers Medion Driver MSI Drivers NEC Drivers nVidia Drivers Packard Bell DriversPositivo Drivers SaharaSahara KN7 Samsung Drivers Single Driver Sony Vaio Toshiba Drivers
     
    Support :
    Copyright © 2011. direct download iso - All Rights Reserved