New Videos from Youtube
Affichage des articles dont le libellé est Installing. Afficher tous les articles

Installing conextant smart audio 221 Windows XP

Last update on 6/22/2014
This guide for most HP and Compaq Laptop especially Presario CQ60, CQ60 series and V3700 and related model, you can leave your comments if you have problems.

AUDIO INSTALLATION:

1. Fisrt for Audio installation you need to install KB888111 first and restart.

Microsoft Universal Audio Architecture
Knowledge Base 888111 (KB888111)
Download (Intel site) 
Download (from HP)

2. Download Your audio driver and extract it (you need winrar software to extract it)

Conextant Smart Audio 221 Drivers
Version 3.49.4.51 1.02MB
Download (mf link)
Download (sd link)
Download (4s link)
(footnote: for future reference Other applicable driver by file name smartaudio221_360a)


INSTALLATION:

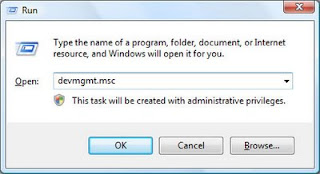
1. Click start and select run, type "devmgmt.msc" like shown in the pictures below.


2. A windows will appear like pictures below, select the "Audio Device on High Definition Audio Bus" with the yellow mark, right click on it and select update driver.


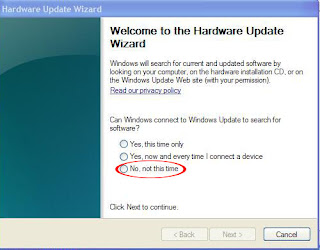
3. Harware update wizard screen will appear, select no to connect, next

---------------------------------------

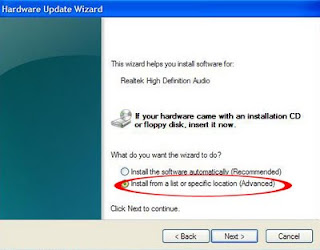
4.Select Install from list specific location, next

--------------------------------------------------

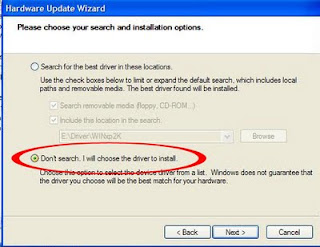
5. select don't search i will choose the driver to install, next


6. Remove the check from "Show Compatible Hardware" and click on "Have Disk".


7. then select browse:

8.Next...browse to the unzipped folder (i assume you extract it at desktop) and open the folder, choose the "WAHER5a.inf".


10. click open, next, Ignore XP when it complains.Reboot.
A-Note Drivers Acer Drivers Alienware DriversApple DriversAsus Drivers-BenQDrivers Clevo Driver Compaq Drivers Dell Drivers DTK Drivers HCLDriver How-To HP Drivers Lenovo Drivers LG Drivers Medion Driver MSI Drivers NEC Drivers nVidia Drivers Packard Bell DriversPositivo Drivers SaharaSahara KN7 Samsung Drivers Single Driver Sony Vaio Toshiba Drivers

Installing Sound in Compaq CQ Series

Compaq Presario CQ series here including CQ40, CQ35 and CQ45. This method also applicable to other model which use IDT audio drivers. For other CQ model which use Conextant audio the patch installation and method is similar, the difference is you need to locate conextant audio drivers.
Last update: June 14 2013

PATCH INSTALLATION

If you already install ms-uaa you may skip this step.
 Before proceed with audio Installation you need to install Microsoft Universal Audio Architecture first. Below is the patch you needed.

Microsoft Universal Audio Architecture (MS-UAA)

Windows XP, XP SP2:  Knowledge Base 888111 (KB888111)
Download 

Windows XP SP3:Knowledge Base 835221 (KB835221)
 Download  (KB835221)

This downloads also available in Microsoft website, you just need to search the KB888111..etc.


DOWNLOAD AND INSTALL: IDT AUDIO DRIVERS

I provide few driver version here which reported work in most CQ40. The trick is simple, you just need to get your original vista drivers first. Here is the recommended and tested driver version.

SP39671.exe: Download - recommended (original xp driver for IDT)
SP41693.exe: Download 
SP45100.exe: Download
SP41616.exe: Download
 
Now Install the driver you selected from the list above or your original vista drivers. (do not restart) If the installation successful with no error, try any audio file for confirmation. If it resulting in error, or no sound after successful installation proceed with next step.

MANUALLY INSTALL DRIVER

This manual installation is also know as "have disk method".

1.First open device manager by click start and select run type "devmgmt.msc" as shown in the pictures below.


2.Below you will see there are many drivers with yellow, select the Audio with the yellow mark, right click on it and select update driver.


3. Harware update wizard screen will appear, select no to connect, next


4.Select Install from list specific location, next


5. select dont searh i will choose the driver to install, next

6.then select all drivers on the next screen then make sure you uncheck the "show compatible drivers" box, select have disk

7. then select browse:


8. Then browse to the directory c:\swsetup


9. Ok in this step i will show for SP39671 audio. So after open the swsetup folder select the SP36971 Folder. If you use other audio make sure to select the folder name similar to yours example: sp45100.


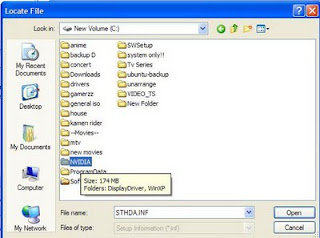
10. After open the SP39671, there 3 folder and select the wdm folder. For other audio driver maybe you will have the similar folder or different, Important to remember we a re looking for files ended with INF extension. Here for SP39671, after open the folder slect WDM folder and Select WInXP folder


11. Then select the STHDA.INF (STHDA64.INF is for 64 bit) anyway press OK . Ignore if XP Complaint. then try to play some music (suggested simple mp3, no rmvb, flv or other player that require codec).
INF file may have different name if you are using different driver version
In case the audio driver you have and i gave earlier didn,t work leave your comments and i will assist you for further instructions.


HDMI and NO SOUND AFTER RESTART

Some model will have issue with HDMI. To know either you have this issue or not, Simply after driver installation above a "new hardware found" windows appear. Download this driver first:
SP39545.exe

Now install this this driver first (do not close a new hardware found windows), after finish install, get back to the "a new hardware found windows" follow the audio installation we did earlier until we get the inf file.

In case the Audio Disappear After restart follow the Guide here:

AUDIO DISAPPAER AFTER RESTART: PART 1
AUDIO DISAPPAER AFTER RESTART: PART 2


A-Note Drivers Acer Drivers Alienware DriversApple DriversAsus Drivers-BenQDrivers Clevo Driver Compaq Drivers Dell Drivers DTK Drivers HCLDriver How-To HP Drivers Lenovo Drivers LG Drivers Medion Driver MSI Drivers NEC Drivers nVidia Drivers Packard Bell DriversPositivo Drivers SaharaSahara KN7 Samsung Drivers Single Driver Sony Vaio Toshiba Drivers

Installing Nvidia Geforce 8200m in CQ60 Guide

UPDATE...
NOTE:

THERE ARE TWO METHOD TO INSTALL IT IN WINDOWS XP.
1. MODDED DRIVERS
2. MANUAL INSTALLATION:

==================
1. MODDED DRIVERS
==================
The method below reported didn't work in some laptop, so here is the common drivers use to install the 8200 graphic:

go to this URL:
http://forums.laptopvideo2go.com/topic/24991-v18681-windows-xp-32bit-nvidia-oem/

OK, here is some advance installation method, we will modify the drivers by replace the INF files with Moded INF.
(what is INF? - every file have its own extension example for picture you have JPG or BMP, and video is MPG, FLV etc, so ther are files with INF file for the installation purpose which you will understand after reading the installayion guide below)

Download the Drivers from the URL i gave above, here is the link again:

http://forums.laptopvideo2go.com/topic/24991-v18681-windows-xp-32bit-nvidia-oem/

You have to download to files here Drivers and INF at the page i gave
1.Download the drivers
2.Then Download The INF
3.After download the drivers you will get 18681 file, double click and extract it, it will create the driver file.
4.Copy the INF file you downloaded and paste(replace) it in the extracted driver files.
6. Install and youre done.

p/s: my connection at home have some problems, when it fix i post the modded drivers so you do not need to modified it. Thanks.


======================
2. MANUAL INSTALLATION
======================
After you install 178.24_geforce_winxp_32bit_english_whql.exe from the link gave at the previous post,
you will get an error message "The Nvidia Setup program could not..............." and it will quit the installation, then do the following :

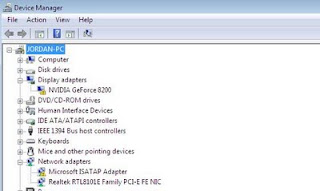
1. Open device manager by click start and select run, type: devmgmt.msc and click ok


2. There Under display right click unknown vga device (mark with yellow), update driver.


3. Select no to connect:

4. Select advance.
5. Select don't search, i will choose the driver.

And then Select Display adapters,next, choose the have disk button. and then click browse.

Browse to C:\nvidia\Win2k\178.24\English\nv4_disp

It will give you a list of models, there are 2 geforce 8200's in the list. Click the first one in the list and click ok.
It will give you the continue anyway option, proceed throught it,

Reboot computer.
A-Note Drivers Acer Drivers Alienware DriversApple DriversAsus Drivers-BenQDrivers Clevo Driver Compaq Drivers Dell Drivers DTK Drivers HCLDriver How-To HP Drivers Lenovo Drivers LG Drivers Medion Driver MSI Drivers NEC Drivers nVidia Drivers Packard Bell DriversPositivo Drivers SaharaSahara KN7 Samsung Drivers Single Driver Sony Vaio Toshiba Drivers

Installing Windows 7: Part 1

 SETTING BIOS - PART 1 - PART 2

Ok, if you finish read part one i consider you already set the BIOS order to boot from CD/DVD. Here in part one it will cover boot from CD and customizing hard disk and partition for Windows 7 installation.

Installing Windows 7: Part 1

1. make sure the Windows 7 DVD already in your DVD Drives.

2. Start you PC/Notebook and wait until it prompt "PRES ANY KEY TO BOOT FROM CD/DVD..." (figure 2), now press any key (it will only wait about 5-6 second, if you have new laptop that have no operating system it will automatically boot from DVD).


(figure 2:images from: http://www.microsoft.com/)


3.Then this screen will appear.


just wait untill it finish loading files.


4. After that the screen (figure 3) will appear. Here just click next ( i recommend new user just left the setting default)


figure 3

5. After click next you will see the screen below (figure 4). Select Install Now

figure 4


6. Then select agree by checking the box. click next.

figure 5

7. When you arrive here (figure 6), you can select upgrade or costum:
     UPGRADE: recomend to those who already have VISTA installed.
     COSTUM : For other version such XP, 98, 2000, Me

here for both vista and XP i suggest custom for fresh installation


figure 6

8. After select custom installation select the partition you wish to install (select C drive recommended) and hit next and skip no 9 and 10.

If you have new HDD select advance driver option.

figure 7

9. For creating new partition only! select new.

figure 8

10. Choose the capacity for your new C drive then apply. (figure 9)
      (below recommended for end user, advance user=u know which better rite)
     40GB: set to 20GB for c(20000MB)
     80GB: set to 30GB for c
     160GB: set to 60GB for c(20000MB)
     250GB: set to 60-80GB for c(20000MB)
     others (for c normally min 50 and max 100)


  figure 9

11. Then click next, now just wait and let it finish the installation.

 
figure 10


 figure 11
at this point your PC/Notebook will restart, and you have to do nothing here.

continue part 2


credits:
http://www.techtalkz.com/windows-7/514412-windows-7-installation-guide-tutorial.html
pictures: Strider
edite by: Black x


A-Note Drivers Acer Drivers Alienware DriversApple DriversAsus Drivers-BenQDrivers Clevo Driver Compaq Drivers Dell Drivers DTK Drivers HCLDriver How-To HP Drivers Lenovo Drivers LG Drivers Medion Driver MSI Drivers NEC Drivers nVidia Drivers Packard Bell DriversPositivo Drivers SaharaSahara KN7 Samsung Drivers Single Driver Sony Vaio Toshiba Drivers

Installing Windows 7: Part 2

 SETTING BIOS - PART 1 - PART 2

Here will cover the final installation for windows 7.

1. let it finish the installation (may take several minutes time to finish)


2. Now here Insert your name (nickname or whatever you like), click next and set your password or just left it blank.


3. Here you can insert you cd-key to activate or just left it blanks if you plan to do it later.


4. Set the time.


5.After that if you have wireless you can directly connect to our preferred network or skip. 


 Now if you see this screen, the installation FINISH.


credits:
http://www.techtalkz.com/windows-7/514412-windows-7-installation-guide-tutorial.html
pictures: Strider
edite by: Black x


A-Note Drivers Acer Drivers Alienware DriversApple DriversAsus Drivers-BenQDrivers Clevo Driver Compaq Drivers Dell Drivers DTK Drivers HCLDriver How-To HP Drivers Lenovo Drivers LG Drivers Medion Driver MSI Drivers NEC Drivers nVidia Drivers Packard Bell DriversPositivo Drivers SaharaSahara KN7 Samsung Drivers Single Driver Sony Vaio Toshiba Drivers

Installing Conexant CX20468-31 AC97 Audio Driver in windows 7

This is my suggestion base on information i collected on the web, so your feedback are most appreciated.


INSTALLING  Conexant CX20468-31 AC97 Audio Driver IN WINDOWS 7.

Before using using this guide below, i recommend you to try install this drivers first see if it works or not:


Conexant CX20468-31 AC97 Audio Driver and Audio Driver EQ
Download SP34789

and also this driver which i already modified:

SP30399 (mod)

If failed this guide may help you to install it.
=============================


There are 2 method to install:


1. Edit the drivers ID
2. Manually install the drivers via device manager


====================
1. Edit the driver files
====================


1. Download the

WINDOWS XP DRIVERS
Conexant CX20468-31 AC97 Audio Driver and Audio Driver EQ
Download SP30399


2. right click and select run as administrator,


3. Then proceed the installation until the installation windows appear.


4. install it and ignore if its error, now we need to find our audio hardware ID first.

Follow Guide here to find your hardware ID, when you get it remember to paste the hardware ID in notepad (for further reference). The result should be like this, the ID is mine realtek audio and not conextant so your ID may differ from mine:


6. Now open c:\swsetup\sp30399


7. Now in the sp30399 folder find the qta3091.inf and open the files.


8. Now find the values i highlight in the picture below.


9. Then paste your hardware ID below the line %*WDM_AMCAUD.DeviceDesc%=WDM_AMCAUD,PCI\VEN_1002&DEV_4370&SUBSYS_3091103C with your hardware ID  in STEP 4.

so the line may look like this:

[Conexant]
%*WDM_AMCAUD.DeviceDesc%=WDM_AMCAUD,PCI\VEN_1002&DEV_4370&SUBSYS_3091103C
%*WDM_AMCAUD.DeviceDesc%=WDM_AMCAUD,PCI\VEN_10B9&DEV_5451&SUBSYS_0024103C&REV_02


Notes: 
The method above use the SP30399 which is XP drivers, you may also test with SP37489 using the same method.


=================
2. Manual Installation
================= 

You need to download and install  SP34789
1.First open device manager by click start and select run type "devmgmt.msc" as shown in the pictures below.


 2. Then on the audio with yellow mark right click and select update driver.


 3. Then select browse my computer for the Driver software

4.Then select let me pick from a list of device drivers on my computer.


5. Then select have disk and select browse

6. Browse to SP34789 and select the Qta3091.inf.
7. Proceed with on screen instruction. Ignore if it complaint.

NOTE:
you may also try with SP30399 at step 5.
A-Note Drivers Acer Drivers Alienware DriversApple DriversAsus Drivers-BenQDrivers Clevo Driver Compaq Drivers Dell Drivers DTK Drivers HCLDriver How-To HP Drivers Lenovo Drivers LG Drivers Medion Driver MSI Drivers NEC Drivers nVidia Drivers Packard Bell DriversPositivo Drivers SaharaSahara KN7 Samsung Drivers Single Driver Sony Vaio Toshiba Drivers
 
Support :
Copyright © 2011. direct download iso - All Rights Reserved