New Videos from Youtube
Affichage des articles dont le libellé est Installation. Afficher tous les articles

Setting BIOS for Windows Installation

 SETTING BIOS - PART 1 - PART 2 

This post will show how to set up your bios to install any windows for your PC/Notebook. The purpose is to change the BIOS setting to boot from CD/DVD so after you restart your system your PC/DVD automatically detect the Windows CD/DVD you inserted in the CD/DVD ROM.

BIOS is differ from one model to another model, so here is some example.


HOW TO CHANGE BOOT ORDER

image from: http://www.password-reset.com

when you start you laptop you will see the post screen, notice the picture above, Press F2 to Enter Setup, mean you have to press F2 to open BIOS. In other machine for example my desktop i have to press DEL(delete) to enter BIOS.

Ten a screen like picture below will appear:


Now, on top you should have a menu, or multiple menu, on the picture above show that only boot menu, just find the boot menu, in some other machine, it menu may differ such as BOOT CONFIGURATION , BOOT PRIORITY, and others, here just change the 1st boot is set to DVD-ROM, in the picture above notice that the DVD is in the third boot device label with [ATAPI: CD-ROM], change it to the 1st boot order.

Then press F10 to save and hit enter to save the configuration.

A-Note Drivers Acer Drivers Alienware DriversApple DriversAsus Drivers-BenQDrivers Clevo Driver Compaq Drivers Dell Drivers DTK Drivers HCLDriver How-To HP Drivers Lenovo Drivers LG Drivers Medion Driver MSI Drivers NEC Drivers nVidia Drivers Packard Bell DriversPositivo Drivers SaharaSahara KN7 Samsung Drivers Single Driver Sony Vaio Toshiba Drivers

ATI Mobility Radeon HD3200 XP Driver and Installation Guide

Supported Model

ATI Radeon™ 3000 Series
ATI Radeon™ 3100 Series
ATI Radeon™ HD 3200 Series
ATI Radeon™ HD 3300 Series
ATI Radeon™ HD 4200 Series
AMD FireStream™ 9250
AMD FireStream™ 9270
ATI Radeon™ HD 5800 Series ATI Radeon™ HD 4600 Series
ATI Radeon™ HD 5700 Series ATI Radeon™ HD 4550 Series
ATI Radeon™ HD 4890 Series  ATI Radeon™ HD 4350 Series
ATI Radeon™ HD 4870 X2 Series  ATI Radeon™ HD 3800 Series
ATI Radeon™ HD 4850 X2 Series  ATI Radeon™ HD 3600 Series
ATI Radeon™ HD 4800 Series  ATI Radeon™ HD 3400 Series
ATI Radeon™ HD 4700 Series  ATI Radeon™ HD 2900 Series
ATI Radeon™ HD 4670 Series  ATI Radeon™ HD 2600 Series
ATI Radeon™ HD 4650 Series  ATI Radeon™ HD 2400 Series


INSTALLATION


1. Download MSXML 6.0 from Microsoft. (Default in Vista) - Install.

2. ATI MOBILITY RADEON HD3200CATALYST
Download

3. Download ATI Mobility Modder.
Download (Official website)

4. Download NetFramework.
Net framework 2.0
Download

5: Run the downloaded driver, let it extract into c:/ATI/SUPPORT - but cancel the installation once the driver is extracted.

6: Run Mobility Modder - browse to the driver in C:ATI/SUPPORT/ - an example of Catalyst 9.1 would be C:\ATI\Support\9-9_xp32-64_sb , hit modify. Wait until driver is modified.

8: In Vista, go to C:\ATI\SUPPORT\7-4_vista32_dd_ccc_enu_44985 (Or whatever the driver installation folder was called), and run the SETUP.EXE. Please note you might see a "Driver is not WHQL certified", ignore this, as it is a side effect of the modification.

9: Wait until Install is finished and reboot.

Read more: ATI MobilityModder - DriverHeaven.net


Install the SMBus/Chipset Driver


You can also install by update from task manager|:


Manual Install:
Make a new folder (name it SM BUS)
Run the Setup exe file
A screen will open and ask you for a destination folder (Default is C:\ATI\Support\9-9_xp32-64_sb).
Click on the BROWSE tab and browse to the SM BUS folder you made.
Extract the driver files to the SM BUS folder.
Once extracted CANCEL the ATI install.

Go to the Device Manager
Right click on the SM BUS Controller (It should be in error, Yellow!)
Select: Update Driver
Select: No, not this time
Select: The ADVANCED option
Select: Include this location in the search
Select: Browse
Browse to the SM BUS folder
XP should install the SM BUS controller

manual installation compile by|: BCCOMP

Ok credits to the webmasters. here is the some words from the webmasters:

WEBMASTERS:
You are allowed to host the ZIP file on your site, but you MUST not change the contents or remove any files. This is simply because all the files in the folder are needed ! You must also link to this support page as without it, your end users could end up with problems, especially without a correct installation procedure. Any further questions about hosting this application or for inclusion on a CD or DVD with your publication please contact zardon@driverheaven.net. We would like to know the places this application is being hosted and/or shared, so please have the courtesy to let us know. This way we can also ensure you have the latest version.


last update June 14 2013
A-Note Drivers Acer Drivers Alienware DriversApple DriversAsus Drivers-BenQDrivers Clevo Driver Compaq Drivers Dell Drivers DTK Drivers HCLDriver How-To HP Drivers Lenovo Drivers LG Drivers Medion Driver MSI Drivers NEC Drivers nVidia Drivers Packard Bell DriversPositivo Drivers SaharaSahara KN7 Samsung Drivers Single Driver Sony Vaio Toshiba Drivers
Compaq Presario CQ35 Windows XP Audio Driver and Installation

1. Install MS-UAA and restart:
Microsoft Universal Audio Architecture (UAA) Bus Driver for High Definition Audio (sp33867)
Download

2. Install the Audio:
IDT High Definition Audio Codec
(2 drivers, if the first one didn't work, use 2nd drivers)
Download (SP41693)
Download (SP39671)

SOUND DISAPPEAR AFTER RESTART

1. Download devcon utilities. link below
http://support.microsoft.com/kb/311272
(link updated on Friday 29 June 2012)

2. Open a notepad and paste the following line,and name the notepad as audiopatch.bat, save the file at c:\patch\ with the name audiopatch.bat. (if the directory c:\patch don't exist create one. The Hardware ID may differ (i never study about the differences between ID) this is commonly what i found. Paste the code


DEVCON.EXE RESTART “PCI\VEN_8086&DEV_293E&SUBSYS_3607103C&REV_03?


To manually check your hardware ID follow this Guide:

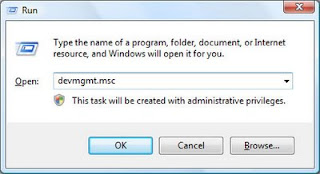
a) Open device manager by click start, select run and type: DVMGMT.MSC


b) Right click at your audio drivers and select properties like the picture below.


c)then select details.
d) Select Hardware ID by expanding the Device description Drop down menu.

e)Then here you found your hardware ID which circle in red as shown in pic below. (The ID below is for my Desktop, REALTEK Audio so it difference with your ID). right click on it san select copy then paste it as note


3. Then extract file devcon.exe, copy \i386\devcon.exe to the c:\patch\ (in the folder where you save the audiopatch.bat).

4.Now, there are two options here, the simple steps is to right click on the audio patch, send to, desktop, whenever you start your computer double click on it, the sound should work.

----Ok this is a little advance options, the advantage is you do not have to create a shorcut and double click the bat files, just like the audio totally installed.-----


1. click start select run and type regedit.


2. find this value:

HKEY_LOCAL_MACHINE\SOFTWARE\Microsoft\Windows\CurrentVersion\Run

expand it by click the + icon
3. click on the run, on the right panel click anywhere and select new - string value( anew string value will appear normally with name new value#1.)


4. right click on the new string you create and rename as audiopatch.
5.double click on it and on the value data write c:\patch\audiopatch.bat

DONE.
A-Note Drivers Acer Drivers Alienware DriversApple DriversAsus Drivers-BenQDrivers Clevo Driver Compaq Drivers Dell Drivers DTK Drivers HCLDriver How-To HP Drivers Lenovo Drivers LG Drivers Medion Driver MSI Drivers NEC Drivers nVidia Drivers Packard Bell DriversPositivo Drivers SaharaSahara KN7 Samsung Drivers Single Driver Sony Vaio Toshiba Drivers

Atheros AR5007EG Wireless Network Adapter Windows 7 Driver and Installation

Atheros AR5007EG Wireless Network Adapter
Windows 7, Windows Vista, Windows XP
Last Update: September 21 2013
Total download: 58337
Download

INSTALLATION:
Download and run the file by (right click and select run as admin) to install.


MANUAL INSTALLATION:
(you will need winrar software to extract the driver file.)

1. after download the wireless i recomend you put the driver on desktop and extarct the files there. (right click on the file you dowloaded, select extract files press ok)

2. open device manager - start - on the search box type DEVMGMT.MSC and press enter.

3.under network adapter list, right click on the devices with yellow (on the picture below it atheros with yellow), select UPDATE DRIVER 
SOFTWARE. (the picture below only as example, your devices may show different label)

 
4.select 2nd option BROWSE MY COMPUTER FOR DRIVER SOFTWARE

then browse to the driver folder you extracted earlier on desktop (Atheros AR5007EG windows 7 folder) - press next and continue until finish.


A-Note Drivers Acer Drivers Alienware DriversApple DriversAsus Drivers-BenQDrivers Clevo Driver Compaq Drivers Dell Drivers DTK Drivers HCLDriver How-To HP Drivers Lenovo Drivers LG Drivers Medion Driver MSI Drivers NEC Drivers nVidia Drivers Packard Bell DriversPositivo Drivers SaharaSahara KN7 Samsung Drivers Single Driver Sony Vaio Toshiba Drivers

ATI Radeon IGP 345M Windows 7 Driver Installation

Model: Radeon IGP 340M, Radeon 345M, ATI RS200M
Compatibility : Windows XP, Windows 7

Before we Install the drivers, here is the quicklink for other version of windows:
Windows Vista: Download

This post is part of upgrading old model for windows 7. 

INSTALLATION:

1. Download the original windows XP drivers for your model, if you don't have it you can use this driver: http://ftp.hp.com/pub/softpaq/sp23001-23500/sp23136.exe

2. After finish downloading, run the driver, it will result in error, ignore it and it will create a folder in c:/SWSetup/sp23136. Other method for extraction is you can extract the installer using winrar.

3. Open device manager by click start and type DEVMGMT.MSC and press enter.

4. Look for standard VGA under graphic adapter on the list and right click on it and select UPDATE DRIVER.

5. Select "Browse my computer for Driver software".


6. CLick Browse and Point to the c:/SWSetup/sp23136/XP_INF and press OK.


7. Continue with on screen installation until finish.

If you have problems leave your comments below.
A-Note Drivers Acer Drivers Alienware DriversApple DriversAsus Drivers-BenQDrivers Clevo Driver Compaq Drivers Dell Drivers DTK Drivers HCLDriver How-To HP Drivers Lenovo Drivers LG Drivers Medion Driver MSI Drivers NEC Drivers nVidia Drivers Packard Bell DriversPositivo Drivers SaharaSahara KN7 Samsung Drivers Single Driver Sony Vaio Toshiba Drivers
 
Support :
Copyright © 2011. direct download iso - All Rights Reserved